back to top
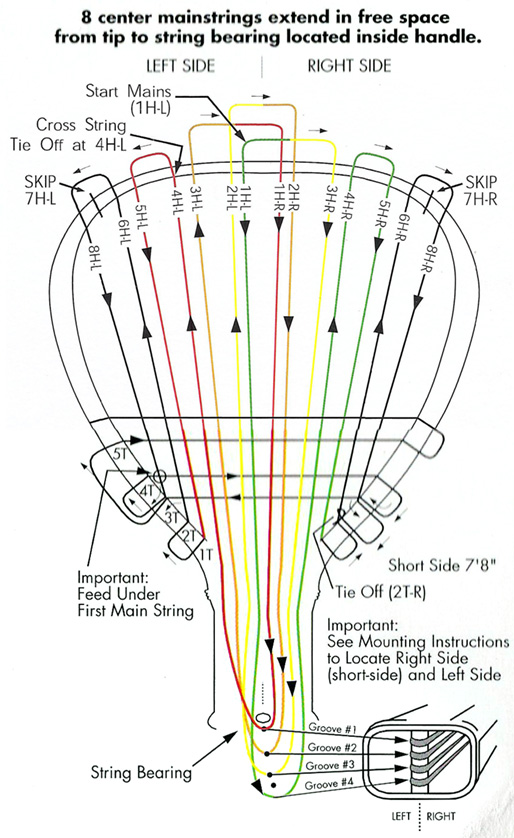
STRINGING INSTRUCTIONS FOR THE FOLLOWING RACQUETS - MLS Bedlam 150/170/190
INSTALLING AND TENSIONING MAINSTRINGS:
Mount to stringing machine with color coded hole numbers up. The "Short side" will be the right side of frame. String pattern is numbered, diagramed, and color-coded at head.
Step 1: Start mainstrings at head, hole 1 left (1H-L). Feed 7'8" of string through 1H-L (green hole) down left side of handle. Wrap strings around groove to hole #4 and feed up through right side of handle to 4H-R (green hole) Clamp string 1H-L near the head then tension 4H-R and clamp.
Step 2: Finish short side by feeling string down 5H-R to 1T-R tension and clamp, then over to 2T-R up to 6H-R tension and clamp, skip 7H-R, down 8H-R, to 3T-R, tension and clamp. CAUTION: If using 38' of string, be sure NOT to use more than 1' excess - otherwise, pull excess string back through 1HL and re-tension per step 1. Tie off at 2T-R.
Step 3: Feed long side end of string through hole 3H-R (yellow hole) down through right side of handle. Wrap string around groove #3 and feed up through left side of handle to 2H-L. pull tension and clamp near head.
Step 4: Feed string down through hole 2H-R (orange hole) down through right side of handle. Wrap string around groove #2 and feed up through left side of handle to 3H-L. Pull tension and clamp near head.
Step 5: Feed string down through hole 1H-R (red hole) down through right side of handle. Wrap string around groove #1 and feed up through left side of handle to 4H-L. Pull tension and clamp.
Step 6: Finish remaining strings by feeding down 5H-L to 1T-L. Tension and clamp, then over to 2T-L up to 6H-L, tension and clamp, skip 7H-L, down 8H-L to 3H-L tension and clamp.
INSTALLING AND TENSIONING CROSS STRINGS:
Step 7: Feed string up to 4T-L and UNDER the first mainstring then weave across to 4T-R. Pull tension and clamp near 4T-R. Feed string down to hole 3T-R, then weave across to 3T-L up to 5T-L and weave across to 5T-R. Pull tension and clamp near 5T-R.
Step 8: Continue installing remaining cross strings. To secure bumper, string 9X (skip 10X) to 11X; then down to 10X up to 12X. Last cross string is between holes 5H-R and 5H-L. Tie off cross strings at 4H-L.
APPENDIX:
Strings are numbered per USRSA convention.
H- Head/Hole
T- Throat
L- Left
R- Right
M's- Mainstrings
X's- Cross Strings
Example: 5H-R = 5th Head Right